Over on YouTube user Kevin Loughin has recently uploaded a video that shows a step by step guide on how to set up an SDRplay RSP2 in Linux. Setting up the RSP2 in Linux is not a simple task, but Kevin’s video walks us through the entire process step by step. At the end of the process you’ll be set up with the SoapySDR framework which is the glue software that sits between the hardware driver and SDR software. You’ll also have the CubicSDR software installed which is what you use for general browsing and listening. CubicSDR is similar to SDRuno, SDR#, HDSDR etc.
Over on YouTube user Kevin Loughin has uploaded a video demonstrating his SDRplay RSP2 running on a Raspberry Pi 3. The software he uses is CubicSDR which is a multiplatform program that is similar to software like SDRUno, SDR#, SDR-Console, HDSDR etc. The video shows CubicSDR running, but the interface is quite slow and laggy, although the audio is at least not choppy.
In a previous post we showed one of Kevin’s earlier videos where he does a tutorial and some scripts that help to actually set up the SDRplay drivers and CubicSDR in Linux. In the new video he first goes over a specific hack that needs to be done in Raspbian to fix the PulseAudio server. Then he explains that you can run the Linux build script mentioned in his previous tutorial video and it should work on the Raspberry Pi 3 just fine. Finally he mentions that CubicSDR and the SDRplay use a high amount of CPU processing on the pi3 so some sort of cooling mechanism is required or the pi3 may throttle down its CPU.
Over on YouTube user MaskitolSAE has uploaded a video showing him receiving some noise bursts from Jupiter with his SDRplay RSP1. The planet Jupiter is known to emit bursts of noise via natural ‘radio lasers’ powered partly by the planets interaction with the electrically conductive gases emitted by Io, one of the the planets moons. When Jupiter is high in the sky and the Earth passes through one of these radio lasers the noise bursts can be received on Earth quite easily with an appropriate antenna
In his video MaskitolSAE shows the 10 MHz of waterfall and audio from some Jupiter noise bursts received with his SDRplay RSP1 at 22119 kHz. According to the YouTube description, it appears that he is using the UTR-2 radio telescope which is a large Ukrainian radio telescope installation that consists of an array of 2040 dipoles. A professional radio telescope installation is not required to receive the Jupiter bursts (a backyard dipole tuned to ~20 MHz will work), but the professional radio telescope does get some really nice strong bursts as seen in the video.
SDRPlay have just announced that their RSP1 unit has just been reduced in price to $99.95 USD. Their press release reads:
SDRplay are pleased to announce a price reduction for their entry-level SDR receiver, the RSP1 to $99.95 USD making it the most competitive mid-range SDR to include reception down to low frequencies without the need for an upconverter. The RSP1 provides general coverage receiver and panadapter capability from 10 kHz to 2 GHz. As well as providing SDRuno SDR software, support for popular 3rd party packages like HDSDR, SDR-Console and Cubic SDR is provided. Recent availability of an SD Card image makes for easy set up on a Raspberry Pi.
Over time we’ve seen the RSP1 reduce in price originally from $299 USD, to half price at $149 USD in March 2015 and then to $129 USD in September 2016, and now finally down to $99 USD. The newer RSP2 remains at a price of $169.95 USD.
During July 24-31 the large Arecibo Radio Observatory in Puerto Rico (the big dish antenna that you may be familiar with from the movie ‘Contact’) ran an Ionospheric heating experiment which involves transmitting 600kW of net power up into the Ionosphere. This type of experiment is used for researching plasma turbulence in the ionosphere and upper atmosphere.
“The new Arecibo ionosphere HF heater nominally transmits 600 kW net power and has a unique Cassegrain dual-array antenna design that increases gain of three crossed dipoles for each band, using the signature 1000-foot spherical dish reflector,” explained Chris Fallen, KL3WX, a researcher at the University of Alaska-Fairbanks HAARP facility. He has reported that Arecibo would use 5.125 or 8.175 MHz, depending upon ionospheric conditions, but emphasized that these are estimates and frequencies may be adjusted slightly. On July 25, Arecibo was transmitting on 5.095 MHz.
Over on YouTube Mike L. used his SDRplay RSP1 together with our BCAM HPF to record some transmissions from the observatory.
Over the last few months we’ve been posting and getting excited about the Airspy HF+, an upcoming high dynamic range HF/VHF receiver designed for DXing. The Airspy team were kind enough to supply us with an early pre-production unit for review.
Long story short, the Airspy HF+ is probably one of the best low cost SDRs we’ve seen for DXing or weak signal reception out there. So far few details on the availability of the HF+ have been released, but we’re aware that preorders are due to start soon, and the target price is expected to be $149 USD from iTead Studio in China.
What follows is the full review and comparisons against other similarly priced SDRs. The Airspy team want us and readers to understand that our review unit is a pre-production model, and apparently already the matching and thus SNR has already been improved by about 2-4 dBs, so the sound samples we provide in the review below should sound even better with the newer revision.
Disclaimer: We received the HF+ for free in exchange for an honest review, but are not affiliated with Airspy. We’ve been in contact with the Airspy team who have helped clarify some points about the architecture and technology used in the design.
Introduction
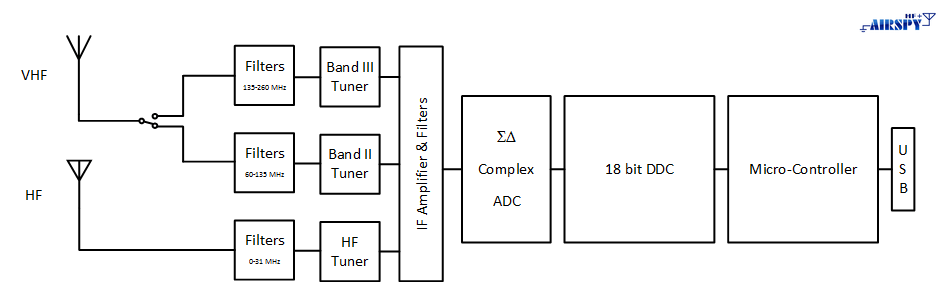
The Airspy HF+ is designed to be a HF/VHF specialist receiver with a frequency range of DC to 31 MHz, and then 60 to 260 MHz. It has a maximum bandwidth of 768 kHz. So the question is then, why would you consider buying this over something like the regular Airspy R2/Mini or an SDRplay RSP2 which both have larger frequency ranges and bandwidths? You would buy the Airspy HF+ because has been designed with DXing and weak signal reception in mind. Basically the main idea behind the HF+ is to design it so that it will never overload when in the presence of really strong signals. Combined with it’s high sensitivity, weak or DX signals should come in much clearer than on the other radios especially if you have strong blocking signals like broadcast AM/FM around.
Aside: What is overloading, intermodulation and dynamic range?
Basically strong signals can cause weak signals to be drowned out, making them not receivable, even though they’re there at your antenna. This is called overloading or saturation. Intermodulation occurs when the SDR overloads and results in images of unwanted signals showing up all over the spectrum.
A simple analogy is to think about what happens when you are trying to drive, but there is sunstrike. The road is very hard to see because the sun is so bright and right in your eyes. The human eye does not have enough “dynamic range” to handle the situation of sunstrike. Dynamic range is a measure of how well a radio (eye) can handle strong (bright) and weak (dark) signals at the same time. The same analogy applies to radios which can struggle to ‘see’ weak signals if there is a very strong signal nearby on the frequency spectrum. There are a few ways to solve this:
Filtering: Block the strong signals that you don’t want using LC filters.
Eye analogy: using your sun visor to block the sun.
Attenuation: Reduce the strength of all signals.
Eye analogy: using sunglasses or squint.
Increase dynamic range: Get a better SDR with better design/technology and more bits in the ADC.
Eye analogy: upgrade your eyes.
Technology and Architecture
The HF+ uses a typical Filter->Tuner ->ADC architecture. So it is not a direct sampling receiver like most of the more expensive SDRs. Direct sampling receivers directly sample the analogue spectrum, without the need for a tuner so they avoid losses and the intermodulation problems that usually come from the mixing stages. But there are some major cutting edge technology differences in the HF+ architecture that should make its performance even better than direct sampling receivers.
Tuner: The tuner on the HF+ is one of the first to use a “Polyphase Harmonic Rejection” architecture. Essentially this means that harmonics produced in the mixing stages are naturally rejected, making the front end filtering requirements much more relaxed. So unlike the tuners used in other SDRs, this one is extremely unlikely overload in the mixing stage.
An additional benefit to this architecture is that the mixer is very low loss, so the LNA in the tuner only needs to use low gain, giving it a very high IIP3 value. So the first LNA which is typically another point of saturation and imermodulation, is very unlikely to saturate in the HF+ design. Most of the amplification only occurs after the mixing stage with the filtered narrowband output of the tuner.
Analogue to Digital Converter (ADC): The ADC is 16-bits and uses a “Sigma Delta” (ΣΔ) design. Basically a Sigma Delta ADC has a natural filtering ability due to its narrowband nature. Instead of seeing say a 30 MHz signal, it only sees 1 – 2 MHz, thus increasing dynamic range and reducing the likelihood of out of band overload.
Digital Down-Converter (DDC): Then after the ADC is a DDC which decimates the output from the ADC, increasing the effective number of bits. The more bits the larger the resolution of the digitized RF signal, so weak signals are less likely to be lost when converted from analogue to digital.
The HF+ Block Diagram
So the block diagram flow goes like this:
A weakly filtered signal enters the tuner, is weakly amplified by the tuner LNA, mixed down to baseband and filtered to 1-2 MHz. It is then amplified and sampled with the sigma delta ADC into 16-bits. The DDC decimates the output into 18-bits which is then sent to the microcontroller and PC via USB.
The Airspy team also compiled this comparison chart for us to understand the differences in architecture between the current SDRs on the market (click to enlarge). This shows that the HF+ is a different type of design compared to other SDRs. Generally the best SDRs out the market right now are direct sampling receivers with many filter banks. The HF+ approaches the problem in a different way, and according to the specs seems to match or better the performance of heavily filtered direct sampling receivers.
Performance from the Airspy HF+ product page is stated as:
-141.0 dBm (0.02 µV / 50 ohms) MDS Typ. at 500Hz bandwidth in HF
-141.5 dBm MDS Typ. at 500Hz bandwidth in FM Broadcast Band (60 – 108 MHz)
-139.5 dBm MDS Typ. at 500Hz bandwidth in VHF Aviation Band (118 – 136 MHz)
-139 dBm MDS Typ. at 500Hz bandwidth in VHF Commercial Band (136 – 174 MHz)
-138 dBm MDS Typ. at 500Hz bandwidth in the upper VHF Band (> 174 MHz)
+26 dBm IIP3 on HF at maximum gain
+13 dBm IIP3 on VHF at maximum gain
110 dB blocking dynamic range in HF
95 dB blocking dynamic range in VHF
Software and User Experience
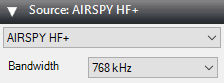
The Airspy HF+ runs on the standard SDRSharp software. The first thing you notice when selecting the HF+ on the SDRSharp menu is how simple the controls are. There is no gain control – the AGC algorithm automatically adjusts the internal gain for maximum SNR, whilst ensuring zero overloading. The only control is the bandwidth selector where you can select from 768 kHz, 384 kHz, 192 kHz, 96 kHz and 48 kHz. Browsing the spectrum without having to adjust the gain slider is quite a liberating experience and the AGC always seemed to optimize the reception nicely.
All the controls you get/need for the HF+
The HF+ is also compatible with the SpyServer software, which allows you to stream the data radio IQ data over a network. SpyServer saves network bandwidth by sending only the currently actively tuned IQ signal plus the waterfall data. This is in contrast to other SDRs like KiwiSDR which send only compressed audio, or rtl_tcp which sends the full IQ data. Sending the IQ data rather than compressed audio allows you to perform various DSP algorithms to the signal on the host side, such as noise filtering. Sending the IQ data (even if only a slice of it) still uses significantly more bandwidth compared to sending compressed audio however, so internet connections and wideband signals such as BCFM may not work well together over long distances and slow internet connections.
External Design/Photos
Note that our pre-production unit does not have the completed metal finish to it yet. The final version is supposed to have a more aesthetically pleasing metal finish applied to the enclosure.
The HF+ is about the size of a pack of cards, and comes in a 90 x 55 x 3 mm metal enclosure with the Airspy HF+ logo stamped onto the top. This thick enclosure gives the HF+ quite some weight at 190 g and a very sturdy feel to it. There are two SMA ports on the left for HF and VHF antennas, and a USB micro port on the right. Two small status LEDs are placed near the SMA ports.
Inside is the PCB, and the main RF circuitry is shielded with a metal can (ignore the poor soldering on the can as this was removed and replaced by us when performing a small mod to the pre-production unit). This double shielding means that the HF+ is well protected against stray RF and USB noise. Also, one interesting feature is the use of a grounding spring on the bottom plate which ensures that the USB connector is grounded with a low impedance connection to the metal enclosure.
Comparison SDRs
In this review we are doing side by side comparisons of the HF+ against similarly priced SDRs, including the ColibriNANO, Airspy Mini + SpyVerter Upconverter and the SDRplay RSP2.
In these tests we compare each SDR on a real world signal. SDRs are cycled through, taking screenshots and recording audio as fast as possible to ensure that conditions don’t change. To verify conditions didn’t change part way through we go through our loop twice to confirm that similar results are recorded.
The HF and below tests use a Wellbrook Loop antenna. VHF Tests use a discone or dipole tuned for the tested band. The RF environment is one with strong broadcast AM and FM stations. The location is 10km away from an AM tower, and LOS to the FM/TV transmitter tower.
In all cases the signal of interest is optimized for best SNR without overloading the SDR. For each SDR we used the officially recommended software package. For the Airspy devices this was SDRSharp, for the ColibriNANO this was ExpertSDR and for the RSP2 this was SDRUno.
With the RSP2 we used the recommended HiZ port for all LF – HF signals and also flipped between then Zero and Low-IF mode choosing the best one. Just to be sure, we tested the A and B ports on the RSP2 as well, but experienced heavy broadcast AM overload (with the filters turned off) and weaker signals than with the HiZ port with the filters on, so did not continue to use these ports.
On the ColibriNANO we used bandwidths at or below 768 kHz to get the 24-bit output.
A modern 2016 Core-i7 laptop run on battery power is used for all tests, but all SDRs were confirmed to run smoothly on an older model Core-i5 desktop PC.
LF (Low Frequency 40 kHz Time Signal)
Airspy HF+
ColibriNANO
Airspy Mini + SV
SDRplay RSP2
RTL-SDR + SV
This signal is a 40 kHz time signal originating from Japan. It is know as the Ohtakadoya-yama LF Standard Time and Frequency Transmission Station (NICT).
From the screenshots we can see that the only SDRs successful at receiving this station where the HF+ and the Airspy Mini + SV.
The HF+ comes in with a very clear copy and there is no sign of overloading from broadcast AM. VLF signals down to 20 kHz are also visible and copyable.
The Mini + SV receives the signal too, but there is significant overloading from broadcast AM stations present all around the signal.
The ColibriNANO cannot receive the signal at all. According to the advertised specifications the ColibriNANO starts receiving at around 100 kHz so this is expected. From the screenshot we start to see a response at around 70 kHz.
The RSP2 just barely receives the signal (a very faint line is visible in the waterfall), but no audio was copyable. There is some minor signs of overload from broadcast AM as well.
NDB’s (~325 kHz)
NDB’s or Non-Directional Beacons are beacons used to aide with aircraft navigation. In this test all SDRs were able to receive NDBs with good performance and it was difficult to notice a difference between SDRs.
Airspy HF+
Airspy Mini + SV
ColibriNANO
SDRplay RSP2
The HF+
The Mini + SV
The ColibriNANO
The RSP2
Broadcast AM (Day)
Here we tested broadcast AM during the day. During the day local broadcast AM is generally stronger and more likely to overload a receiver. Distant stations come in weaker. We tuned to a weak station and tested reception.
Airspy HF+
Airspy Mini + SV
ColibriNANO
SDRplay RSP2
The HF+ receives the signal well and audio is copyable.
The AS Mini + SV is noticeably noisier, but can still receive a barely copyable signal.
The ColibriNANO is also quite noisy and seems to have muffled voice audio. Various settings were attempted to improve the reception/muffled voice, but none worked well.
The RSP2 seems unable to receive the station clearly and has some overload present. Gain had to be set to near minimum to avoid further overload.
Broadcast AM (Night)
Here we tuned to the broadcast AM band and tested reception with one of the weaker signals.
Airspy HF+
ColibriNANO
SDRplay RSP2
The HF+ receives this weak station clearly and fading is minor.
The ColibriNANO received the station but seemed to be a bit noisier with more static coming through.
The RSP2 also receives the station clearly, but there is a bit more static noticeable in the background.
2.6 MHz FAX
Receiving a fax signal about 1 MHz above the broadcast AM band.
Airspy HF+
ColibriNANO
SDRplay RSP2
The HF+ received the fax cleanly.
The AS Mini + SV was not tested as the fax finished before we could get to it.
The ColibriNANO received the fax cleanly.
The RSP2 received the fax as well as the other receivers, but on the waterfall are some broadcast AM station images. Reducing the gain reduced the fax signal strength, but the images remained as well.
7 MHz Shortwave
Airspy HF+
Airspy Mini + SV
ColibriNANO
SDRplay RSP2
The HF+ receives weak shortwave stations well with pretty clear audio.
The Mini + SV has similar performance to the HF+
The ColibriNANO seems to be a bit noisier.
The RSP2 experienced quite a bit of fading which wasn’t as intense on the other SDRs. It didn’t seem to be related to changing conditions as switching back to another SDR after the RSP2 didn’t show the effect.
88.9 MHz FM
Airspy HF+
Airspy Mini
SDRplay RSP2
Weakly received from this location, TX 50km away and not designed to cover the RX region.
The HF+ receives this with a fair amount of clarity.
The AS Mini is a similar to the HF+, but a bit noisier.
The ColibriNANO cannot receive the station at all since external filters are required in VHF undersampling mode so we did not record anything for it.
The RSP2 cannot receive the station. Various gain, ZIF/LIF settings were tried, but it would not come in. It can be faintly seen on the waterfall. There is also aliasing of the signal on the left showing up on the right of the spectrum.
96.03 MHz FM
This is someones private repeater of a low power FM station which seems to be illegally radiating. Very closely spaced to a powerful station on the frequency spectrum.
Airspy HF+
Airspy Mini + SV
ColibriNANO
SDRplay RSP2
The HF+ quite clearly has a very noticeable sensitivity edge on the broadcast FM spectrum as can be heard in the audio examples. The HF+ audio seems to be noticeably clearer.
The AS Mini receives the station too, but it noticeably noisier.
The ColibriNANO cannot receive the station at all. As it is working in undersampling mode, it is possibly overloaded. To use undersampling mode successfully filters are required.
The RSP2 works similarly to the AS Mini.
96.2 MHz FM
Receiving a regular non-E’s FM station about 120km away.
Airspy HF+
Airspy Mini
SDRplay RSP2
ColibriNANO
The HF+ was able to receive the FM station fairly clearly
The AS Mini could also receive the station, but the audio was barely audible. Turning up the gain further caused overload, a rise in the noise floor and a weakening of the SNR.
The ColibriNANO could not receive this station, so we did not record any audio.
The RSP2 was also able to receive the station, but like the AS Mini the audio was barely audible.
Pagers
In this location we have some very strong pagers at 158 MHz and most SDRs show signs of overloading near to the pager frequency. The HF+ seemed to handle them quite well, however when two transmitted at once there was a about a 100ms period of overload before the AGC kicked in to reduce the gain.
HF+ Receiving strong pagers. Two transmitting at once.
Here we tested a weak signal about 2.5 MHz below the pagers.
Airspy HF+
Airspy Mini
SDRplay RSP2
The HF+ was able to clearly receive this data station without any sign of overload from the pagers.
The Airspy Mini could also receive the station, but much weaker. Turning up the gain any further caused overload, and caused pager + WFM noise to appear over the frequency whenever the pager transmitted. Even at a gain setting of 10 there was some mild interference noticeable in the screenshot when the pager transmitted.
The RSP2 could also receive the station with fairly good strength, but intermodulation was severe whenever the pager transmitted, causing a loss of signal. Turning down the gain did not help with the interference, and only reduced the signal of interests’ strength further. Enabling the MW/FM filter did not help as the pager interferer is outside the notch range.
The ColibriNANO could not receive this station.
Conclusions
The Airspy HF+ is an exceptional SDR and will truly please any DXers or people wishing to listen to weak stations. It is a relatively narrowband SDR (in comparison to say the Mini/R2 and RSP2) that can only tune up to 260 MHz, so don’t expect to be able to use it as a wideband scanner for trunked radios for example. But on VHF it would perform very well on FM DX, airband voice scanning and for 137 MHz WX satellites. The reception on the HF+ is almost entirely unaffected by extremely strong pagers in the 157 MHz region.
Below 30 MHz the HF+ also shines. VLF to MW is the best we’ve seen on any sub $300 SDR. Overload is non-existent on broadcast AM, and no effects from the strong AM signals can be seen further up on the spectrum.
The closest competing unit to the HF+ in terms of price and use cases (designed for HF) is probably the ColibriNANO. But the ColibriNANO commands a decently higher price at $350 USD. Performance on HF seems similar, but we do have to give a slight edge to the HF+. The ColibriNANO also has the downside of poor LF/VLF reception (advertised response starts at 100 kHz), and heavily aliased VHF/UHF due to undersampling. A filter is needed for proper operation on VHF/UHF. That said the ColibriNANO itself is a very good SDR, but the HF+ certainly wins out in terms of value and general performance and we can’t see any situation where the ColibriNANO would be a better choice at the moment.
The Airspy Mini/R2 and SDRplay RSP2 also generally perform well for the majority of signals, but will struggle when it comes to really strong signals. Comparing against these SDRs on weak signals near strong blockers really shows where the HF+ shines. But when compared against regular (non-weak) signals or in a tame RF environment without strong signals then it is pretty much impossible to determine which SDR is better.
So there is obviously some brand new cutting edge technology going on in this receiver with the polyphase harmonic rejection mixer and the sigma delta ADC which possibly even puts it on top of the very expensive direct sampling SDRs. On the HF+ weak and DX signals are noticeably more accessible. Performance for the price (expected $149USD) is phenomenal. This is a highly recommended SDR.
Disclaimer: We received the HF+ for free in exchange for an honest review, but are not affiliated with Airspy. We’ve been in contact with the Airspy team who have helped clarify some points about the architecture and technology used in the design.
Back in March of this year together with Mike (KD2KOG) we brought out a metal enclosure for the SDRplay RSP1. The enclosure includes a BCFM filter as well as a nice carry case. We’ve been collecting a few images of users using this enclosure, and this is simply a picture showcase of those images.
If you’re interested in the enclosure we still have some limited stock remaining over on our store at www.rtl-sdr.com/store.
In the latest version of the ARRL QST magazine editor Steve Ford (WB8IMY) has released a comprehensive review and set of measurements for the SDRplay RSP2 / RSP2Pro. The review is also freely available online in pdf format from the SDRplay website (pdf warning).
The review initially focuses on the differences between the RSP1 and the RSP2 units, explaining how most differences occur in the front end circuitry. WB8IMY then goes on to review SDRuno, the official software package of SDRplay units. The review is fairly brief, but the most interesting part is the lab test results which are displayed throughout the review.
WB8IMY performed several benchmark lab measurements such as frequency coverage, MDS (minimum discernible signal) levels (note MDS measured at 400 Hz instead of the standard 500 Hz for some reason), noise figure, AM and FM sensitivity, blocking gain compression dynamic range, two tone IMD tests, second order intercept points, FM adjacent channel selectivity and more. The results can be useful for comparing against other SDRs.
ARRL RSP2 Lab Measurement Results (see the PDF for the full set of results)
Over on YouTube Mike from the SDRplay team has created a tutorial video that shows how to use the SDRuno EXTIO edition. SDRuno is the official software of the SDRplay line of products and can be freely downloaded from the SDRplay website. The EXTIO edition allows other non-SDRplay SDR units to freely be used with SDRuno. The only restrictions are that the maximum bandwidth is artificially restricted to 2.5 MHz and some DSP filters are missing.
In the video Mike shows how to set up the SDRuno workspace to work with an RTL-SDR dongle and demos reception of some signals. Note that the EXTIO dll file for the RTL-SDR mentioned in the video is the same one required for HDSDR, and can be downloaded from the dll table on the HDSDR website.
If you’re interested in more, Mike has a full SDRuno tutorial series available on the SDRplay YouTube channel which mostly focuses on usage with the SDRplay units, but could be applicable to the EXTIO version as well.
Recently we’ve reduced the price of our RSP1 Metal Enclosure upgrade kit from $39.95 down to $29.95 USD. You can purchase the kit from our store. The kit comes with:
1x Metal Enclosure
1x Carry case
1x BCFM Filter with SMA Male to Male Adapter
1x Accessory set including rubber feet, screws, grounding post.
On Amazon USA there are less than 16 units left, and shipped from China from our store there is less than 85. We won’t be restocking this item for a few months so please get in quick if you are interested.
Thanks to RTL-SDR.com reader 'flatflyfish' for submitting information on how to get Martin Marinov's TempestSDR up and running on a Windows system. If you didn't already know by definition "TEMPEST" refers to techniques used by some spy agencies to eavesdrop on electronic equipment via their unintentional radio emissions (as well as via sounds and vibrations). All electronics emit some sort of unintentional RF signals, and by capturing and processing those signals some data can be recovered. For example the unintentional signals from a computer screen could be captured, and converted back into a live image of what the screen is displaying.
TempestSDR is an open source tool that allows you to use any SDR that has a supporting ExtIO (such as RTL-SDR, Airspy, SDRplay, HackRF) to receive the unintentional signal radiation from a screen, and turn that signal back into a live image. This can let you view what is on a screen without any physical connections. If a high gain directional antenna is used then it may be possible to receive images from several meters away as well.
TempestSDR showing what's on the screen via unintentional RF radiation from the monitor.
Although TempestSDR has been released now for a number of years it hasn't worked properly in Windows with ExtIO interfaces. In his email flatflyfish showed us how to compile a new version that does work.
1. You need to install a 32-bit version of the Java runtime. The 64-bit version won't work with extio's possibly because they are all 32-bit. Also install the JDK.
2. You need to install MingW32 and MSYS and put their bin folders in your Windows PATH.
3. Then when compiling I was seeing a lot of CC command unknown errors. To fix that I just added CC=gcc to the top of all makefiles. I also removed the Mirics compilation line from the JavaGUI makefile to make things easier as we're not using that sdr.
4. Originally my JDK folder was in Program Files. The makefile didn't like the spaces in the folder, so I moved it to a folder without spaces and it fixed the errors.
5. Lastly to compile it you need to specify the ARCHNAME as x86 eg "make all JAVA_HOME=F:/Java/jdk1.7.0_45 ARCHNAME=X86"
After doing all that it compiled and I had a working JAR file. The extio's that are used normally with HDSDR work fine now and I get some images from my test monitor with an rtlsdr.
We tested compilation ourselves and were successful at getting a working program. To help others we've just uploaded a fork of the code with the makefile changes done, as well as a precompiled release ZIP available on the releases page so no compilation should be required to just use it. Note that to use the precompiled JAR you still need to install MingW32, and also don't forget to install the MingW /bin and msys /1.0/bin folders into the Windows PATH. You also do need to have the 32-bit Java runtime installed as the 64-bit version doesn't seem to work. On at least one Win 10 machine we also had to manually add a 'Prefs' folder to the Java path in the registry.
We've tested the software with the ExtIO for RTL-SDRs (available on the HDSDR downloads page) and confirmed that it works. Images from one of our older DELL monitors using DVI are received nicely, although they are a bit blurry. We also tried using an Airspy or SDRplay unit and this significantly improved the quality of the images a lot due to the larger bandwidth. The quality was good enough to make out large text on the screens. ExtIO's for the Airspy are available on this page, and for the SDRplay on the official SDRplay website. Note that for the SDRplay we were unable to go above 6 MHz, and on the RTL-SDR 2.8 MHz was the limit - anything higher on these SDRs did not produce an image possibly due to dropped samples.
To use the software you should ideally know the resolution and refresh rate of your target monitor. But if you don't there are auto-correlation graphs which actually help to predict the detected resolution and frame rate. Just click on the peaks. Also, you will need to know the frequency that your monitor unintentionally emits at. If you don't know you can browse around in SDR# looking for interference peaks that change depending on what the image of the screen is showing. For example in the image below we show what the interference might look like. A tip to improving images is to increase the "Lpass" option and to watch that the auto FPS search doesn't deviate too far from your expected frame rate. If it goes too far, reset it by re-selecting your screen resolution.
Unintentionally radiated RF signal from computer screen shown in SDR#
The best results were had with the Airspy listening to an older 19" DELL monitor connected via DVI. A newer Phillips 1080p monitor connected via HDMI had much weaker unintentional signals but images were still able to be recovered. A third AOC 1080p monitor produced no emissions that we could find.
Clear images were obtained with an antenna used in the same room as the monitor. In a neighboring room the images on the DELL monitor could still be received, but they were too blurry to make anything out. Possibly a higher gain directional antenna could improve that.
An example set up with RTL-SDR antenna and monitors
Below we've uploaded a video to YouTube showing our results with TempestSDR.
Over on YouTube Leif 'sm5bsz' has uploaded a video that does a lab comparison of various SDRs on the market now including the new Airspy HF+. Leif is known for providing excellent lab based technical reviews of various SDR products on his YouTube channel.
The first video compares the Airspy HF+ with the Perseus SDR. The Airspy HF+ is a new high performance yet low cost ($199 USD) HF/VHF specialty SDR. The Perseus is an older high performance direct sampling HF only SDR, although it comes at the high price of about $1000 USD.
In his tests Leif tests both units at 14 MHz and finds that the HF+ has about 15 dB better sensitivity compared to the Perseus (NF = 7dB vs 22dB). On the other hand the Perseus has about 23 dB better dynamic range compared to the HF+ (Dynamic Range = 127 dBc/Hz vs 150 dBc/Hz), although he notes that a blocking transmitter needs to have a very clean signal to be able to notice this difference which would be unlikely from Amateur transmitters.
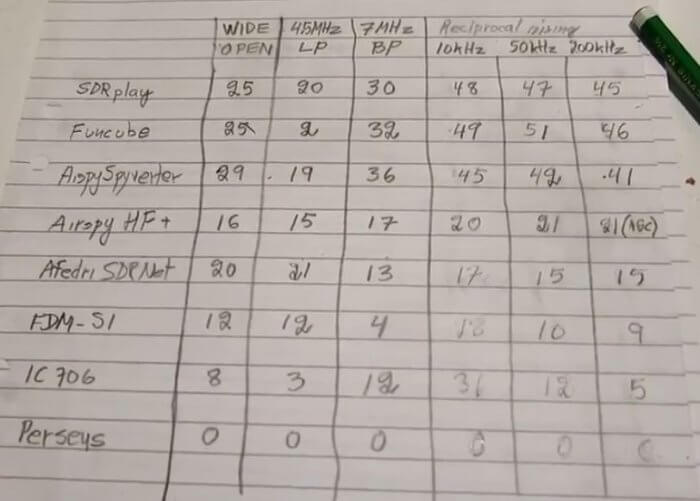
In the next two videos Leif compares multiple SDRs including the SDRplay RSP1, FUNcube Pro+, Airspy with Spyverter, Airspy HF+, Afedri SDR-Net, ELAD FDM-S1, ICOM IC-706MKIIG and Microtelecom Perseus at 7 MHz.
In the RX4 video Leif compares each SDR on dynamic range at 7 MHz. If you want to skip the testing parts, then the discussion of the results in the RX4 tests start at 1:03:00. A screenshot of the results is also shown below. The SDRs are ranked based on their average results over multiple measurements at different times which is shown in the last column. A lower value is better, and the value represents how much attenuation needed to be added to prevent the SDR from overloading and causing interference in his setup.
Dynamic Range Test Rankings
In the RX5 video the results start at 54:20:00. In this video he compares the SDRs with real signals coming in from his antenna at 7 MHz. He tests with the antenna signal wide open, with a 4.5 MHz LPF (to test out of band blocking performance), and with a bandpass filter at 7 MHz. Again lower values are better and the values indicate the amount of attenuation required to prevent overload. The Perseus is used as the reference benchmark. He also tests reciprocal mixing later in the video.
Like the HF+ mentioned in the previous post, the RSP1A SDR was also recently released and has now had enough time in the wild to gather up a few online reviews. If you didn't already know, the $99 US SDRplay RSP1A is a revision of the RSP1. Compared to the RSP1 it significantly improves the filtering and front end design. We have our own review of the RSP1A unit here, and we mentioned some early reviews from other bloggers in this linked post. Below we post some of the new reviews that we are aware of which have come out since our last post.
Robert Nagy
In his video Robery Nagy does a full review of the RSP1A including a 15 minute primer on SDRs. This is great if you want a brief introduction to understanding how SDRs actually work, and what performance measures are important for comparing them. In the second half of the video Robert shows how to use SDRuno and shows the RSP1A in action.
Mile Kokotov
In this video Mile Kokotov demonstrates the HF+ receiving a CW contest in his home country of Macedonia with the RSP1A and a full-size half wave resonant dipole antenna. He writes:
CQ World Wide DX Contest (CW) receiving in Macedonia with SDRplay RSP1A SDR-receiver and SDRuno software on 80m-Band with full-size half-wave (40 meters long) resonant dipole antenna.
Contest conditions are always big challenge to any receiver dynamics. Here you can see only 60 kHz wide frequency spectrum fulfilled with many competitor stations "fighting each other". In addition, there are local radio-station (only 1 km from my place) with huge signal...
The Radio Hobbyist
In The Radio Hobbyist's video on YouTube Rick (VE3CNU) unboxes his RSP1A and shows the setup and download of SDRuno. He then goes are demonstrates reception on various signals.
icholakov
In icholakov's video on YouTube he compares the older RSP1 with the newer RSP1A on medium wave and shortwave reception using a dipole in a noisy suburban RF setting. Differences are hard to detect as the signals he tests with are not likely to cause any overloading issues, but the RSP1A does seem to have a slightly less noise.
Over on the SDRplay forums there has been a post by a NOAA engineer showing how they are using SDRplay RSP2 units in the field for tracking their radiosonde weather balloons. A radiosonde is a small sensor package and transmitter that is carried high into the atmosphere by a weather balloon. It gathers weather data whilst transmitting the data live back down to a base stations. You can get data such as temperature, pressure, humidity, altitude and GPS location.
Bobasaurus' coworker launching a weather balloon.
The NOAA engineer on the forum (handle 'bobasaurus') wrote SkySonde, which is the software used by NOAA to decode and plot data from the radiosondes. SkySonde is freely available for public download on the NOAA website. A PDF file showing how to use the SkySonde software with an RSP2 or RTL-SDR can be found here, and the full SkySonde manual is available here. The software consists of a client and server, with the server connecting to the RSP2 or RTL-SDR, and then sending data to the client. Both server and client can run on the same PC.
The hardware setup consists of an RSP2 (can be interchanged with an RTL-SDR), an Uputronics Radiosonde Filtered preamp and a Yagi antenna. Presumably a Yagi and LNA is not completely required, although the receivable range will be less. The RSP2 bias tee is used to power the preamp, and on a V3 RTL-SDR the bias tee should also work.
NOAA appears to use the iMet brand of radiosondes which transmit a Bell 202 signal. Bobasaurus writes that they transmit in the 401-405 MHz range. This video shows an example of such a signal. If you are in the US near an area that launches these iMet weather balloons you should be able to receive them. An alternative piece of software that supports iMet radiosondes is RS. For other radiosondes we have a tutorial that uses SondeMonitor available here.
Over on his YouTube Channel Mile Kokotov has uploaded a video that compares three mid priced SDRs: the Airspy HF+, the SDRplay RSP1A and the ColibriNANO. Each SDR is compared on several ALPHA and NBD morse code stations which exist in his tests from between 14 kHz to 474 kHz. He writes:
In this video I am comparing three SDR-Receivers. I have made few recordings with every receiver with the same antenna and choose the best one (one with the best SNR = signal-to-noise ratio). My intention was to ensure the same conditions for all three SDR`s in order to make as fair as possible comparison. For example, I was set the frequency span displayed on the window to be as same as possible for all three receivers. The vertical axis for the signal stregth, was set to be equal (in decibels) too.Airspy HF+ and ColibriNANO was set to their minimum sample rate (48 kHz). RSP1A was set to minimum sample rate (2 MHz and 8 decimation).
No DSP enhancing on the SDR`s was used except APF (Audio peak filter) on ColibriNANO (I forgot to swith off).
The differences between each receiver as very difficult to detect as only really challenging signal conditions will really set them apart. Mile also added in a comment:
You should not expect the difference to be very obvious! If you compare one average transceiver (which cost about $ 1000 USD) and top class transceiver which cost ten times more, the difference in the receiving the average signals will be very small too. Almost negligible! But when you have difficult conditions, the very weak signal between many strong signals, than the better receiver will receive the weak signal readable enough, but cheaper receiver will not. Today it is not a problem to design and produce the sensitive receiver, but it is very difficult to design and produce high dynamic receiver for reasonable price! The Airspy HF+ and RSP1A are very very good SDR-receivers. They have different customers target and have strong and weak sides. For example Airspy HF+ has better dynamics in frequency range where it is designed for, but RSP1A, on the other hand, has broadband coverage...
Frequent reviewer of SDR products Mile Kokotov has just uploaded on his YouTube channel a new video where he compares the Airspy HF+ against the SDRplay RSP1A on FM broadcast reception.
At first Mile compares the two against strong broadcast stations, and then later compares them on weak DX stations surrounded in amongst other strong stations. With the strong stations a difference between the two radios is impossible to detect. But with the weaker stations that are surrounded by strong signals the Airspy HF+ has the edge with it's higher dynamic range and sensitivity.
Mile writes:
In this video I am comparing two popular SDR-Receivers (Airspy HF+ and SDRplay RSP1A) on FM Broadcast Band.
I have made few recordings with every receiver with the same antenna trying to set the best SNR = signal-to-noise ratio.
My intention was to ensure the same conditions for both SDR`s in order to make as fair as possible comparison.
No DSP enhancing on the SDR`s was used.
Antenna was Vertical Dipole.
When receiving signals are strong enough, You should not expect the difference between most receivers to be very obvious!
If you compare one average transceiver (which cost about $ 1000 USD) and top class transceiver which cost ten times more, the difference in receiving average signals will be very small too. Almost negligible! But when you have difficult conditions, the very weak signal between many strong signals, than the better receiver will receive the weak signal readable enough, but cheaper receiver will not. Today it is not a problem to design and produce the sensitive receiver, but it is far more difficult to design and produce high dynamic receiver for reasonable price! The Airspy HF+ and RSP1A are very very good SDR-receivers. They have different customers target and have strong and weak sides. For examle Airspy HF+ has better dynamics in frequency range where it is designed for, but RSP1A, on the other hand, has broadband coverage...
The official software package of the SDRplay range of products is SDRuno and it has recently been updated to version 1.22. SDRuno is also compatible with the RTL-SDR.
In addition to some UI improvements for new users, the main changes are pasted below. What's also very interesting is their road map which states that future versions of SDRuno will have frequency scanning capabilities, a remote network streaming server/client implementation and an API for the support of third party plugins. This would improve it's capabilities similar to that of SDR#.
Added • Support for 1366×768 default layout • ADC overload detection in AGC off mode • ADC overload acknowledgment system to avoid lockout condition • Custom step size for each mode • Band Button Groups (Ham Lower, Ham Upper, Broadcast) • Two additional SP1 width presets (2560 and 3840) • Additional menu option in memory panel to reset column widths (helps when upgrading) • Scheduled Recording • Auto update
Changed • Registry reset now only clears 1.2+ entries • SP1 Window max size supports 4K displays (3840×2160) • Small improvements to the memory panel (panel width and field width changes) • Improvements to the IF output mode • UTC time fixed to 24 hour format • Play!/Stop button colour coordinated • Move MUTE button to make way for VOLUME label • Moved Squelch value display to the right
Fixed • Log10 SING error • Aero support detection to try to prevent rendering issues • Freezing when switching to HiZ port in gain mode • Gain “pumping” issue when in gain mode • Settings panels not displaying properly when “un-minimised” • Zoomed in frequency scale drag out of bounds bug • Noise floor measurement bug • Improved RSP error handling • Sample rate change causing spectrum display issues • Device selection bug
Known Issues • SP2 CWAFC drift issue (Zoom/window size/freq display) – will be addressed in 1.23, workaround for now is to zoom out fully in the SP2 window and then the CWAFC feature will work. • IF output mode disabled SP1 spectrum mouse clicks – temporary issue until LO is separated from the VFO (see plans below)
Following on from the 1.21 release where we outlined the features for coming releases, we have updated our plans, as shown below. The purpose of publishing this information is to give people an insight to the development plans but it is NOT a guarantee of the exact feature line-up and we cannot give release dates.
1.23 Intermediate update • Recording of selected signal only (either I/Q or audio) to WAV file format • Selected signal piped to VAC in I/Q format
1.3 Major update • Separation of VFO and LO frequency control • Frequency scanning
1.31 Intermediate update • Remote client for network based streaming I/Q server applications
1.4 Major update • Addition of new API for third party plugins
Jon Hudson, head of marketing at SDRplay has recently released a helpful tutorial that shows how to access remote servers in SDR-Console V3, and also how to set up your own server too. As you may already know, SDR-Console V3 provides a remote server platform which allows you to access all sorts of SDR hardware remotely over a network connection or over the internet. Some SDR hardware owners even opt to share their radio hardware publicly over the internet for anyone to access. The video description reads:
This video is a screen-by-screen guide to both accessing, and setting up your own, remote SDR radio using the new (Feb 2018) SDR Console V3 software from SDR-Radio. Although the guide uses an RSP2 from SDRplay, this will work with all the popular SDRs
Please note - you need to have a good internet connection since (unlike in V2), the entire I/Q data is being sent over the internet. This also limits how much visual bandwidth you are can see at any one time.
SOME IMPORTANT WARNINGS IF YOU ARE ADDING YOUR OWN SDR! Be careful not to plug multiple SDRs into a single USB2 socket - for multiple SDRs, you may need a powered hub ( like this: https://www.amazon.co.uk/UGREEN-Adapt... )
Once you are up and running - please go to http://www.sdr-radio.com/Software/Ver... and view your listing - if there is a yellow triangle, then you are not accessible outside your own firewall - attention is needed! Just because you can access it on your own LAN doesn't mean it's accessible via the internet!!!
The RSP family of SDRs from SDRplay cover 1kHz to 2 GHz with no gaps and give up to 10MHz spectrum visibility.
Jon's video first shows how to use SDR-Console V3 to access those publicly shared SDR radios over the internet. The second part of the video demonstrates how to set up your own server that you can use remotely for personal use, or to share over the internet.
The SDR-Console V3 server accepts various kinds of SDR hardware including RTL-SDR, Airspy, SDRplay, HackRF, Elad, LimeSDR and many more SDR units so this is a good way to explore various types of hardware, or simply to explore signals from different areas around the world.
Over on YouTube radio content creator Techminds has recently started a series that shows how to decode various signals using an SDR such as the SDRplay RSP1A. The first video explains what FT-8 is and shows how to decode it using the WSJT-X software. FT-8 is a modern digital HF ham mode that is designed to be receivable even in weak signal reception. However, the amount of information sent in a FT-8 message is small, so it is not possible to have a full conversation, and you can only make contacts.
In his second video Tech Minds explains RTTY and also shows how to decode it. RTTY is another much older mode that is used by the military as well as hams. To decode it he uses Digital Master 780 which is a program included in the Ham Radio Deluxe software.
SDRplay have recently published an informative white paper that explains what intermodulation and higher order mixing effects are, and how they can affect reception on an SDR such as the SDRplay. This paper could be a useful introduction to understanding how to optimize reception of weak signals when they are in the presence of strong signals. While written for the SDRplay, the same knowledge and tips could be applied to any similar SDR.
Later in the paper they also show how to eliminate intermodulation effects by enabling the MW/AM notch filters on the SDRplay RSP1A unit, and by carefully choosing the LO frequency.
The RSP1A covers the spectrum from 1kHz to 2GHz, and phantom signals can be a menace for all wideband SDR receivers. More and more is being published about the most obvious culprit which is inter-modulation caused by very strong interferers such as MW/FM broadcast transmitters – indeed, all the current SDRplay RSPs have built in filters to help reduce the problems caused by that.
But the reality is, particularly at HF and below, that a phantom signal may occur for other reasons such as higher order mixing effects. Sometimes, it can be difficult to know what is the cause of the phantom signal. If you can understand the cause, there are additional steps you can take to overcome it.
We’ve just published this white paper to explain the difference between intermodulation and higher-order mixing effects, and what practical steps you can take to reduce the latter in particular. Our example uses an RSP1A operating at frequencies below 60MHz.
First pager of the SDRplay whitepaper on intermodulation effects.